


In our last session, we explored how to add blur effects in CapCut PC a must-know for privacy and focus control. You learned how to blur faces, sensitive data, or backgrounds to draw attention to what matters most.
We also discovered how blur can make videos feel cinematic, soft, and emotionally rich.
Now, we’re taking that visual control to the next level.
Because today… it’s all about Green Screen Magic the editing secret that lets you teleport your subject anywhere in the world.
Ever watched your favorite YouTuber stand on Mars or a product ad with a floating perfume bottle over a galaxy?
That’s the green screen effect, also known as Chroma Key.
Green screen editing allows creators to:
-
Replace boring or messy backgrounds.
-
Add virtual environments or product backdrops.
-
Merge reality and imagination — perfect for ads, reels, and storytelling videos.
-
Look professional without expensive studios.
And the best part?
CapCut makes it ridiculously easy.
Let’s break it down in 7 easy steps so even a beginner can follow like a pro.
(Trust me, once you master this, you’ll never shoot plain videos again.)
-
Open CapCut Desktop and click New Project.
-
Import your main video background (like a landscape or scene).
-
Then, import your green screen clip (your subject).
Pro Tip: Place your green screen clip above the background layer in the timeline.
-
-
Click on your green screen video in the timeline.
-
You’ll see editing tools appear at the top.
-
Find the Cutout or Chroma Key option — that’s where the magic begins.
-
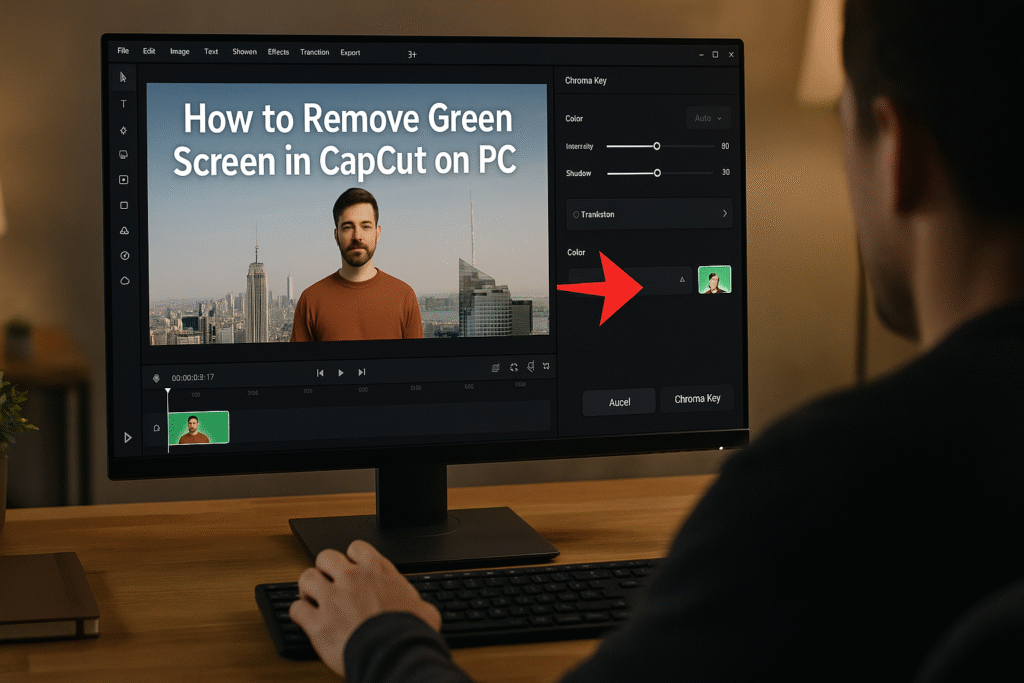
Step 3: Activate the Chroma Key
-
Click Cutout > Chroma Key.
-
Use the Color Picker (eyedropper) tool and tap on the green area in your video preview.
CapCut instantly detects the green color and starts removing it.
-
You’ll see two sliders: Intensity and Shadow.
-
Slowly move the Intensity slider until all green edges disappear.
-
Use the Shadow slider to balance lighting and soften edges.
Take your time — small tweaks make a huge difference.
-
Drag your desired background (video, photo, or animation) to the track below your clip.
-
Resize or reposition your subject so it blends naturally with the new background.
Boom! You’ve just teleported your subject anywhere you want.
-
-
Adjust brightness, contrast, and color temperature to match the lighting of your new background.
-
Add a subtle shadow blur under your subject for realism.
-
Test by previewing in full-screen mode — it should feel seamless.
-
- Once you’re satisfied, click Export in the top-right corner.
- Choose your format (MP4 for web, MOV for high quality). Now, share it proudly. Your first pro-level green screen video is complete.
Let’s get creative. Here are five real-world ways to use Green Screen effectively:
Replace plain backgrounds with stylish motion visuals or brand colors.
Example: A coffee cup floating over a sunrise scene.
Film yourself on a green screen and drop in dynamic backdrops — waves, space, neon grids for strong branding.
Replace messy home backgrounds with clean office environments.
Recreate cinematic worlds or imaginary places without leaving your room.
Use overlays like “floating text” or animated environments to make your lessons more engaging.
In this guide, you learned how to remove green screen in CapCut on PC from importing footage to mastering Chroma Key adjustments.
We covered pro lighting, background blending, and avoiding common keying mistakes.
Whether you’re creating product ads, tutorials, or cinematic clips, mastering green screen in CapCut PC instantly levels up your production value.
-
Because content has gone global.
Everyone — from solo creators to major brands — is competing for visual dominance.Green screen editing gives you:
✅ Control over visual storytelling.
✅ Ability to shoot anywhere, anytime.
✅ A professional edge without huge budgets.
✅ The flexibility to adapt visuals for TikTok, YouTube, or Ads.In short: it’s the most powerful low-cost creative skill in modern video production.
-
CapCut PC makes green screen editing simple, fast, and professional.
-
The Chroma Key tool is your entry into cinematic-level visuals.
-
Adjust intensity and lighting carefully for realistic blending.
-
Combine with blur, color grading, and motion effects for ultimate polish.
-
Green screen mastery unlocks endless creative freedom.
-
Using uneven lighting (causes green patches).
-
Choosing low-quality footage — compression ruins keying accuracy.
-
Forgetting to match perspective between layers.
-
Setting intensity too high — you’ll lose body edges.
-
Ignoring color temperature mismatches.
-
Using overly busy backgrounds.
-
Forgetting to feather or soften edges.
-
Keeping green reflections on skin or clothes.
-
Not previewing transitions before exporting.
-
Exporting at low bitrate — results in visible green outlines.
-
Use even lighting – Shadows make color detection harder.
-
Avoid wearing green clothing – or you’ll vanish with the background!
-
Shoot with good contrast – The sharper the subject edges, the cleaner the cutout.
-
Keep your distance from the screen – Prevents color spill on your subject.
-
Adjust Intensity slowly – Overdoing it makes your subject transparent.
-
Add feathering – Smooth edges look more natural.
-
Match lighting between subject and background – Otherwise, it looks fake.
-
Use blur for realism – Slight background blur gives depth.
-
Refine with shadow slider – Adds definition and prevents harsh edges.
-
Preview before exporting – Always check playback in motion.
Here are some ideas:
TikTok videos
School projects
Product promo videos
Gaming clips
Vlogs
CapCut is especially good for AI video ads for ecommerce marketing, meaning you can:
 Create product showcase videos Add auto captions to increase sales Use AI templates for fast results
Perfect for beginners who want to create professional ads.
While the mobile app is great, the desktop version gives you:
-
A bigger screen to edit better
-
More control over effects and text
-
Faster editing and exporting
-
Keyboard shortcuts to save time
-
Better AI features for ads & business
If you want to grow on social media or make marketing videos, desktop editing will make your life easier.
Because video is the future!
By 2030, over 90% of online content will be video.
People who can edit videos will have:
✅ More job opportunities
✅ More business growth
✅ Better marketing results
✅ Bigger social media audience
Learning CapCut now makes you ahead of many others
Green screen isn’t just a trick — it’s a gateway to creativity.
It lets creators, marketers, and storytellers reimagine reality without limits.
So next time you shoot a video, think beyond your room.
With CapCut’s Chroma Key tool, you control the world your story lives in.
Find quick answers to the most common questions about how to remove Green Screen in CapCut on PC and discover how this simple editing step can instantly make your content more engaging, professional, and ready to grab attention in 2026.
Yes! Use the Chroma Key tool under Cutout to remove any green background easily.
Absolutely! just pick the blue color with the eyedropper tool. You can remove anhy color you want.
How do I fix leftover green edges?
Increase the Intensity slider slowly and adjust Shadow to blend edges.
Why is my green screen not removing properly?
Poor lighting or uneven color may cause it. Use well-lit, evenly green footage.
Can I replace the background with a video instead of an image?
Yes, you can use any media — images, videos, or even animated backgrounds.
Does CapCut PC support motion tracking with green screen?
Not yet natively, but you can simulate it by keyframing position manually.
Will removing green screen reduce video quality?
No, if exported at high resolution (1080p or 4K). Avoid over-compression.
Can I do multi-layer compositing in CapCut PC?
Yes, stack multiple tracks for advanced effects or virtual scenes.
Can I change the color of my background instead of adding one?
Yes — simply replace the track with a solid color or gradient background.
Is CapCut free for green screen editing?
No, You need a Pro subscription for Green Screen Removal.