


In Day 13, we explored the Zoom In Keyframe in CapCut PC; a powerful way to guide your viewer’s eyes and create cinematic storytelling. You learned five different zoom styles; from product highlights to punch zooms that brought your videos to life.
Now that your camera movement is sharp and intentional, it’s time to control focus, not just by motion, but by blur.
Blur is one of the most underestimated tools in video editing. Most creators think it’s only for censoring — hiding faces, car plates, or text. But professionals know better. Blur adds depth, emotion, and clarity. It tells your audience where to look, what matters most, and what to ignore.
In this post, we’ll go beyond just blurring. You’ll learn five smart ways to apply blur in CapCut PC to:
-
Protect identities and sensitive info
-
Add cinematic focus and soft backgrounds
-
Create transitions or atmosphere
-
Stylize intros and outros
-
Blur selectively for storytelling impact
By the end, you’ll know how to make your videos look cleaner, more professional, and visually balanced.
Here’s the exact process to create your first zoom animation:
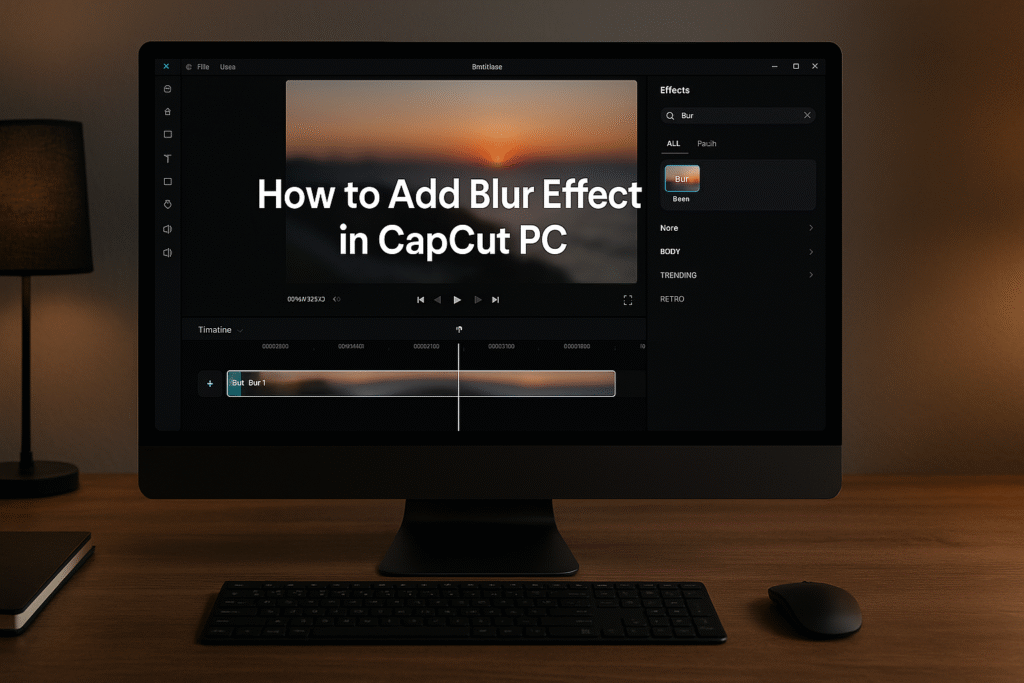
Open CapCut Desktop and import your clip into the timeline.
-
Go to the Effects tab (on the top toolbar).
-
Open the Basic category.
-
Choose Blur.
-
Drag and drop it onto your timeline, above the clip you want to edit.
Step 3: Adjust the Blur Layer
Once added, click the blur effect layer.
Resize or reposition it to cover the area you want blurred — for example, a face or a license plate.
Use the Effect Controls panel to increase or decrease the blur intensity.
Pro tip: A mild blur (15–25%) keeps context visible while softening focus. For full privacy, increase up to 80–100%.
If the object or face moves, use keyframes to follow it smoothly. Add keyframes at different points on the timeline and adjust blur position accordingly.
That’s the basic method. But let’s go deeper; there are five creative ways to apply blur in CapCut PC.
Let’s get creative. Here are five real-world ways to use blurs effectively:
Perfect for interviews, vlogs, or street footage.
-
Add the blur effect above your clip.
-
Resize it over the face.
-
Use keyframes to track motion frame-by-frame.
💡 Pro Tip: Combine with “Gaussian Blur” for a smoother look.
When your video includes email addresses, phone numbers, or on-screen notifications:
-
Add a blur overlay layer on top of the area.
-
Keep blur strong (70–90%) for complete censorship.
-
Optionally, add a small “Sensitive Info Hidden” label for clarity.
Want a cinematic feel without a fancy lens?
-
Duplicate your main clip.
-
Apply blur to the bottom clip.
-
Mask your subject on the top clip.
This isolates the subject sharply against a soft background, mimicking DSLR focus.
💡 Pro Tip: Combine with subtle color grading for a filmic vibe.
Ceate fluid scene changes with motion blur.
-
Apply a blur effect at the end of Clip A and start of Clip B.
-
Animate the intensity — high at midpoint, zero at start/end.
It feels natural and cinematic — a technique used in music videos and short films.
For action scenes, gaming edits, or energetic sequences:
-
Add Directional Blur or Zoom Blur (if available).
-
Adjust direction and strength for motion emphasis.
💡 Pro Tip: Combine motion blur with beat-synced cuts for dynamic pacing.
- Directs Attention: Blur removes distractions and guides the viewer’s eye.
- Adds Professionalism: Subtle blur adds polish — like shallow depth of field in high-end cameras.
- Protects Privacy: Essential for ethical content creation, especially with public footage.
- Evokes Emotion: Soft focus creates warmth and intimacy; strong blur builds mystery.
- Balances Composition: Helps isolate main subjects and create cleaner frames.
-
Use blur to hide, highlight, or stylize.
-
Combine keyframes for moving subjects.
-
Try background blur for cinematic depth.
-
Use transition blur for flow between scenes.
-
Experiment with intensity — subtle blur often looks more natural.
1. Don’t Overdo It — Subtle Blur Looks More Cinematic
Too much blur can make your video look unnatural or cheap. Keep intensity between 15–30% for a professional depth-of-field effect. Remember: in film, less is often more.
2. Combine Blur with Zoom for Focus Pulls
Add keyframed zoom-ins while slightly increasing blur on the background. This mimics DSLR “focus pulls” — instantly giving your edit a cinematic camera feel.
3. Use Multiple Blur Layers for Complex Scenes
Got two or more faces or items to censor? Don’t stretch one blur box — duplicate the effect layer and position each blur precisely. It keeps edges clean and consistent.
4. Animate Your Blur Intensity for Transitions
Instead of abrupt scene cuts, use blur that gradually increases at the end of one clip and fades at the start of the next. It’s a subtle yet powerful cinematic transition.
5. Track Moving Subjects with Keyframes
If the person or object moves, use keyframes every few seconds to reposition your blur. It’s a manual step — but it looks seamless and professional.
6. Blend Blur with Color Grading for Dreamy Vibes
Apply a light blur with warm color tones (under Adjustments → Filters) to create soft, dreamy scenes — perfect for lifestyle, fashion, or emotional storytelling videos.
7. Use Gaussian Blur for Softer Edges
Prefer a gentle, creamy blur instead of pixelated softness? Look for “Gaussian Blur” under the effect library — it blends beautifully with high-resolution footage.
8. Blur Backgrounds to Simulate Expensive Lenses
Duplicate your main clip → blur the bottom layer → mask your subject in the top.
Boom — instant shallow depth of field that looks like a cinematic lens shot.
9. Create Motion Energy with Directional Blur
For action sequences or sports edits, try Directional Blur. Adjust the direction (e.g., 45° or 90°) to make fast movements feel more dynamic and powerful.
10. Blur + Text Combo = Professional Focus Guide
When displaying important text (e.g., prices, quotes, tips), blur the background slightly to make the typography pop — a favorite trick in product ads and tutorials.
In CapCut PC, adding blur is simple yet powerful. By exploring five creative ways from privacy blur to cinematic background depth you can enhance your storytelling, professionalism, and viewer focus. Whether you’re making vlogs, tutorials, or branded content, mastering blur helps you control what your audience sees and feels.
Here are some ideas:
TikTok videos
School projects
Product promo videos
Gaming clips
Vlogs
CapCut is especially good for AI video ads for ecommerce marketing, meaning you can:
 Create product showcase videos Add auto captions to increase sales Use AI templates for fast results
Perfect for beginners who want to create professional ads.
While the mobile app is great, the desktop version gives you:
-
A bigger screen to edit better
-
More control over effects and text
-
Faster editing and exporting
-
Keyboard shortcuts to save time
-
Better AI features for ads & business
If you want to grow on social media or make marketing videos, desktop editing will make your life easier.
Because video is the future!
By 2030, over 90% of online content will be video.
People who can edit videos will have:
✅ More job opportunities
✅ More business growth
✅ Better marketing results
✅ Bigger social media audience
Learning CapCut now makes you ahead of many others
Blurring isn’t just about hiding — it’s about refining.
With CapCut PC, you can easily protect privacy, shape focus, and elevate visual storytelling using blur. Start experimenting with subtle gradients, keyframes, and layered effects.
Every pro editor knows: clarity isn’t about showing more; it’s about showing what matters most.
So go ahead; try one of these blur techniques today.
Because in editing, sometimes the most powerful thing you can do…
is let something fade softly away.
- How to download and Install CapCut Desktop in 2026
- Mastering CapCut Basic Editing Tools 2026
- How to import Videos on CapCut PC?
- How to trim videos in CapCut PC?
- Filters and Effects in CapCut PC
- How to cut/clip video in CapCut PC?
- Crop Video in CapCut PC
- How to Freeze Frame in CapCut PC?
- How to Reverse Video in CapCut PC 2026?
- How to add Custom Stickers in CapCut Pc 2026?
- Best Export Settings in CapCut PC?
- How to add overlay in CapCut PC?
- How to remove Green Screen in CapCut PC?
- How to add blur effect in CapCut PC?
- Zoom in Key Frame Step by Step using CapCut Desktop
- How to adjust speed in CapCut PC?
- How to add Music in CapCut PC?
- How to add your own voice in CapCut PC?
- How to add text in CapCut PC?
- How to use CapCut Templates on PC?
- Add Auto Captions on CapCut PC
- Add Transitions in CapCut PC
Find quick answers to the most common questions about how to add blur effect in CAPCUT PC and discover how this simple editing step can instantly make your content more engaging, professional, and ready to grab attention in 2026.
Use the Blur effect and resize it over the face. Add keyframes to follow the movement.
Use “Ease In/Out” keyframe settings — it softens transitions and removes jerky motion.
How do I make only the background blurry?
Duplicate your video, blur the bottom layer, and mask out the subject in the top layer.
What’s the best blur intensity for cinematic effects?
Start between 20–30%. Increase slightly for stronger separation or privacy.
Does CapCut PC support motion tracking for blur?
Currently, it doesn’t have automatic tracking — use manual keyframes to follow movement precisely.